This blog has moved / Este blog se ha trasladado
Please go to sergiodiaz.eu/blog . Por favor, visita sergiodiaz.eu/blog .

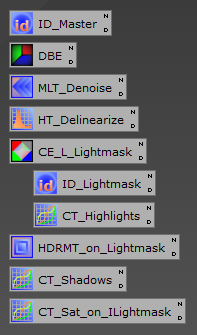
On the workspace, as many of us surely do, I place the process icons from top to bottom trying to make evident (for the future me) the order in which they should be applied, like some sort of vertical timeline, naming them according to its intent and indicating if should be applied with a mask; in case of doubt, fortunately the project saves the history of every view, so no problem here. To represent the processing of an intermediate image, I usually place the icons in a parallel vertical "timeline". This more or less work well for simple cases but for serious projects could be a mess to reproduce all the steps in the pipeline.
Maybe the ideal solution would be that the user interface of PI allowed for connecting the process icons with arrows, representing the flow of the outputs to the inputs of the next processing step, graphically designing the computational graph. One click on some start button and PI would reproduce all steps in the correct order. But honestly, this would mean a lot of work for PI developers and we already have a powerful solution in PI: scripting.
So, for serious projects we can write a script that implements our pipeline. It will be useful for reproducing all the processing steps but also for documenting unambiguously our pipeline.
But this can mean a lot of work if we approach it from scratch. So we will review here some of the tools we have at hand, and propose another one as a helper for code generation.
First of all, the History Explorer has a 'New Instance' icon (lower left corner), that we can drag to the workspace to create a ProcessContainer icon with all steps of the history of that view. The context menu has an 'Edit Instance Source Code...' option that we may use to directly generate all the code involved! This is a good start point: we should do this for every view, and then merge the code to get a master script. We should be aware though, that we may have to interleave the execution of the different ProcessContainers, e.g, when we generate a mask from the master image, process it and then apply to the master image for further processing. So practically we have to ditch the ProcessContainers themselves, and keep the process instances definitions. To get a working script, we must add code for opening the images, and of course, the code for the pipeline itself, essentially a chain of process executions on different views in a particular order. But there is another catch: some processes won't go to the history containers, namely those that generate an intermediate image without changing the target view itself (so there is nothing to save to history), we must declare them manually.
A script generated this way would define its own process instances based on a "snapshot" of the current workspace, i.e., if we modify the parameters of one process icon, the script should be manually modified to reflect the change. On the other hand, being the script is a snapshot of our current pipeline, we can keep it easily on a version control system such as git. As the script is auto-contained, the project itself may not be needed anymore (but I wouldn't recommend to discard it anyway). Also we could even launch it from the command line!
Another approach would be using a custom script to generate the code, as complete as we possibly can. This is what I tried here, with some (important) limitations that we'll cover later. I named this tool ReproduciblePI,js (optimistically) and made it available on github.
Regarding the code generated for the process instances, ReproduciblePI,js offers two options:
To handle image views, optionally the script could also generate code for loading them from disk files. This is mostly interesting for auto-contained scripts. For intermediate images the script generate code to reference the view, but [caveat #2:] we should manually place these references in the correct place inside the pipeline, and also take into account that the original view id may have been altered in the pipeline. In workspace-dependent scripts, all views are accesible by reference, i.e, they're supposed to be already loaded if they are image files.
ReproduciblePI,js tries to reconstruct a sort of a global history for the project and then build the pipeline based on it. For that, it tries to match the processes of each view history with the icons in the workspace, and sort them by execution start time. So [caveat #3:] it is imperative that all processes have been already executed. Even so, there are processes that creates new views without changing its target so they won't get registered in the target view history containers, as already discussed, but in the initial state of the newly created view. If they are on the workspace, in the generated code they will be instantiated and inserted in the pipeline , but [caveat #4:] their target view should be manually identified as the script cannot do so.
// ____/ Views \________________

// TODO:
// - Views generated by the pipeline must be declared there (cut and paste from here).
// - Views whose id has changed during the pipeline must be changed below (use the original id).

// Master: C:/Users/aristarco/Pictures/Test_Master.xisf
var Master = View.viewById("Master");
// Lightmask:
var Lightmask = View.viewById("Lightmask");


// ____/ Process Icons \________________

// ImageIdentifier
var ID_Master = ProcessInstance.fromIcon("ID_Master");
// DynamicBackgroundExtraction
var DBE = ProcessInstance.fromIcon("DBE");
// MultiscaleLinearTransform
var MLT_Denoise = ProcessInstance.fromIcon("MLT_Denoise");
// HistogramTransformation
var HT_Delinearize = ProcessInstance.fromIcon("HT_Delinearize");
// ChannelExtraction
var CE_L_Lightmask = ProcessInstance.fromIcon("CE_L_Lightmask");
// ImageIdentifier
var ID_Lightmask = ProcessInstance.fromIcon("ID_Lightmask");
// CurvesTransformation
var CT_Highlights = ProcessInstance.fromIcon("CT_Highlights");
// HDRMultiscaleTransform
var HDRMT_on_Lightmask = ProcessInstance.fromIcon("HDRMT_on_Lightmask");
// CurvesTransformation
var CT_Shadows = ProcessInstance.fromIcon("CT_Shadows");
// CurvesTransformation
var CT_Sat_on_ILightmask = ProcessInstance.fromIcon("CT_Sat_on_ILightmask");


// ____/ Pipeline \________________

function pipeline() {
	// ID_Master( Master )
	ID_Master.executeOn(Master);

	// DBE( Master )
	DBE.executeOn(Master);

	// MLT_Denoise( Master )
	MLT_Denoise.executeOn(Master);

	// HT_Delinearize( Master )
	HT_Delinearize.executeOn(Master);

	// CE_L_Lightmask( UNDEFINED )
	CE_L_Lightmask.executeOn(UNDEFINED);

	// ID_Lightmask( Lightmask )
	ID_Lightmask.executeOn(Lightmask);

	// CT_Highlights( Lightmask )
	CT_Highlights.executeOn(Lightmask);

	// HDRMT_on_Lightmask( Master )  [  Lightmask ]
	Master.window.setMask(Lightmask.window);
	HDRMT_on_Lightmask.executeOn(Master);
	Master.window.removeMask();

	// CT_Shadows( Master )
	CT_Shadows.executeOn(Master);

	// CT_Sat_on_ILightmask( Master )  [ ~Lightmask ]
	Master.window.setMask(Lightmask.window, true);
	CT_Sat_on_ILightmask.executeOn(Master);
	Master.window.removeMask();

}


pipeline();
This code needs some work to be functional. Before starting, read the comments. Let's go:// ____/ Views \________________
// TODO:
// - Views generated by the pipeline must be declared there (cut and paste from here).
// - Views whose id has changed during the pipeline must be changed below (use the original id).
// Master: C:/Users/aristarco/Pictures/Test_Master.xisf
var Master = View.viewById("Test_Master");
// ____/ Process Icons \________________
// ImageIdentifier
var ID_Master = ProcessInstance.fromIcon("ID_Master");
// DynamicBackgroundExtraction
var DBE = ProcessInstance.fromIcon("DBE");
// MultiscaleLinearTransform
var MLT_Denoise = ProcessInstance.fromIcon("MLT_Denoise");
// HistogramTransformation
var HT_Delinearize = ProcessInstance.fromIcon("HT_Delinearize");
// ChannelExtraction
var CE_L_Lightmask = ProcessInstance.fromIcon("CE_L_Lightmask");
// ImageIdentifier
var ID_Lightmask = ProcessInstance.fromIcon("ID_Lightmask");
// CurvesTransformation
var CT_Highlights = ProcessInstance.fromIcon("CT_Highlights");
// HDRMultiscaleTransform
var HDRMT_on_Lightmask = ProcessInstance.fromIcon("HDRMT_on_Lightmask");
// CurvesTransformation
var CT_Shadows = ProcessInstance.fromIcon("CT_Shadows");
// CurvesTransformation
var CT_Sat_on_ILightmask = ProcessInstance.fromIcon("CT_Sat_on_ILightmask");
// ____/ Pipeline \________________
function pipeline() {
// ID_Master( Master )
ID_Master.executeOn(Master);
// DBE( Master )
DBE.executeOn(Master);
// MLT_Denoise( Master )
MLT_Denoise.executeOn(Master);
// HT_Delinearize( Master )
HT_Delinearize.executeOn(Master);
// CE_L_Lightmask( Master )
CE_L_Lightmask.executeOn(Master);
// Lightmask:
var Lightmask = View.viewById("Master_L");
// ID_Lightmask( Lightmask )
ID_Lightmask.executeOn(Lightmask);
// CT_Highlights( Lightmask )
CT_Highlights.executeOn(Lightmask);
// HDRMT_on_Lightmask( Master ) [ Lightmask ]
Master.window.setMask(Lightmask.window);
HDRMT_on_Lightmask.executeOn(Master);
Master.window.removeMask();
// CT_Shadows( Master )
CT_Shadows.executeOn(Master);
// CT_Sat_on_ILightmask( Master ) [ ~Lightmask ]
Master.window.setMask(Lightmask.window, true);
CT_Sat_on_ILightmask.executeOn(Master);
Master.window.removeMask();
}
pipeline();
